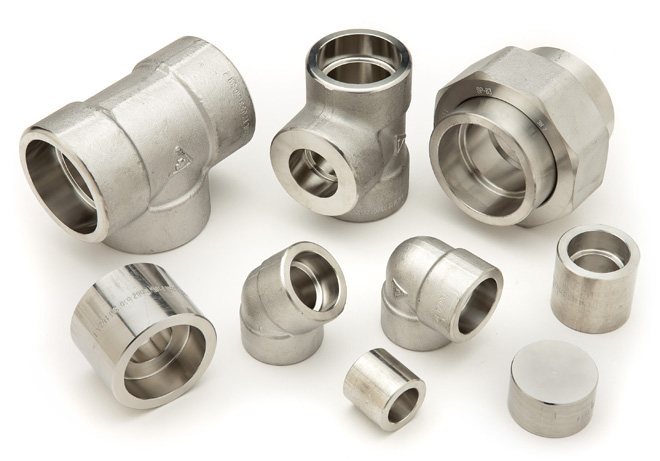
ASME B16.11 – Forged Fittings, Socket-Welding and Threaded
ASME B16.11 – Forged Fittings, Socket-Welding and Threaded
1 SCOPE
1.1 General
This standard covers ratings, dimensions, tolerances,marking and material requirements for forged fittings, both socket-welding and threaded, as illustrated in Tables 4 through 7 and Il through I4, inclusive.
1.1.1 Fitting Types/Configuration.
Types of fittings covered by this Standard are shown in Tables IA and 1 B, by class and size range. Fittings shown in Tables 4 through 7 and II through I4 may also be made with combinations of socket-welding and threaded ends.
1.1.2 Special Fittings.
Fittings with special dimensions, threads or counterbores may be made by agreement between the manufacturer and the purchaser. When such fittings meet all other stipulations of this Standard, they shall be considered in compliance therewith, provided they are appropriately marked (see para. 4).
1.1.3 Quality Systems.
Nonmandatory requirements relating to the product manufacturer’s Quality. System Program are described in Nonmandatory Appendix A.
1.2 References
1.2.1 Referenced Standards.
Standards and specifications adopted by reference in this Standard are shown in Mandatory Appendix II, which is part of this Standard. It is not considered practical to identify the specific edition of each standard and specification in the individual references. Instead, the specific edition reference is identified in Mandatory Appendix II.
A fitting made in conformance and conforming to this Standard, in all other respects, will be considered to be in conformance to the Standard, even though the edition reference may be changed in a subsequent addendum to or revision of the Standard
1.2.2 Codes and Regulations.
A fitting used under the jurisdiction of the ASME Boiler and Pressure Vessel Code, the ASME Code for Pressure Piping, or a governmental regulation is subject to any limitation of that code or regulation. This includes any maximum temperature limitation, or rule governing the use of a material at low temperature, or provisions for operation at a pressure exceeding the ratings in this Standard.
1.3 Service Conditions
Criteria for selection of fitting types and materials suitable for particular fluid service are not within the scope of this Standard.
1.4 Welding
Installationwelding requirements are not within the scope of this Standard. Installation welding shall be done in accordance with the applicable piping Code or regulation covering the piping system into which the fittings are installed.
1.5 Standard Units
The values stated in either metric units or inch units are to be regarded separately as standard. Within the text, the inch units are shown in parentheses. The values stated in each system are not exact equivalents,therefore, each system must be used independently of the other. Combining values from the two systems may result in nonconformance with the standard Tables 4 through 7 show fittings dimensional requirements in millimeters. Tables I L through I4 show the dimensional requirements for inch dimensioned fittings.
2 PRESSURE RATINGS
2.1 General
These fittings shall be designated as Class 2000, 3000, and 6000 for threaded end fittings and Class 3000, 6000, and 9000 for socket-weld end fittings.
2.1.1 Basis of Rating.
The schedule of pipe corresponding to each Class of fitting for rating purposes is shown in Table 2. Design temperature and other service conditions shall be limited as provided by the applicable piping code or regulation for the material of construction of the fitting. Within these limits the maximum allowable pressure of a fitting shall be that computed for straight seamless pipe of equivalent material (as shown by comparison of composition and mechanical properties in the respective material specifications).The wall thickness used in such computation shall be that tabulaced in ASME B36.1oM for the size and applicable schedule of pipe reduced by applicable manufacturing tolerances and other allowances (e.g,threaded allowances).Any corrosion allowance and any variation in allowable stress due to temperature or other design shall be applied to the pipe and fitting alike.
2.1.2 Nonstandard Pipe Wall Thickness.
Since ASME B36.10M does not include Schedule 160 nor double Extra Strong thickness for DN 6, 8, and 10 (NPS 1/8, 1/4, and 3/8), the values in Table 3 may be used as the nominal wall thicknesses of the pipe for rating purposes.
2.1.3 Combination End Fittings.
The Class for fittings made with combinations of socketwelding and threaded ends shall be based on the end configuration that has the lowest rating from Table 2.
2.2 Pressure Test Capability
Pressure testing is not required by this Standard but the fittings shall be capable of withstanding a hydrostatic test pressure required by the applicable piping code for seamless pipe of material equivalent to the fitting forging and of the schedule or wall thickness correlated with the fitting Class and end connection of Table 2.
3 SIZE AND TYPE
3.1 General
The following table shows nominal pipe size (NPS) used for inch dimensioned fittings versus nominal diameter (DN), used for millimeter dimensioned fittings.
3.2 Reducing Fitting Size
In the case of reducing tees and crosses, the size of the largest run opening shall be given first, followed by the size of the opening at the opposite end of the run. Where the fitting is a tee, the size of the branch is given last. Where the fitting is a cross, the largest side-outlet is the third dimension given, followed by the opening opposite. The line sketches, Fig. 1, illustrate how the reducing fittings are read.
4 MARKING
4.1 General
Each fitting shall be permanently marked with the required identification by raised lettering and/or by stamping, electroetching, or vibrotool marking on the collar portion, raised pad or raised boss portion of the forging. Cylindrical fittings shall be marked on the O.D. or on the end of the fitting in a location such that the marking will not be obliterated as a result of welding installation. The marking of bushings and plug is not required by this Standard.
4.1.1 Specific Marking
The marking shall include (but is not limited to) the following:
(a) Manufacturer’s Name or Trademark
(b) Material Idehtificatiorc.
Material shall be identifled in accordance with the marking requirements of either the appropriate ASTM Fittings Specification A234, A403, A420, or B366, or the appropriate ASTM Forging Specifications AI05, A182, A350,B160, B164, or other applicable forging Specification of Table 1, ASME B16.34 (see para. 5.1).
(c) Product Conformance. Fittings covered under para.1.1.1 shall be marked with either the ASTM Fittings Specification material identification (e.g.,”WP)or the symbol “B16” to denote conformance to this Standard. Fittings covered under para.1.1.2 shall be marked B16SPLD.
(d) Class Designation. 2000, 3000, 6000, or 9000, as applicable. Alternatively, the designation 2M, 3M, 6M, or 9M, as applicable, may be used where M stands for 1000.
(e) Size. The nominal pipe size related to the end connections.
4.1.2 Omission of Markings.
Where size and shape of fittings do not permit all of the above markings, they may be omitted in the reverse order given above.
5 MATERIAL
5.1 Standard Materials
The material for fittings shall consist of forgings, bars, seamless pipe, or tubular products which conform to the requirements for melting process, chemical composition requirements, and mechanical property requirements of the forging
product form listed in Table 1,ASME 1316.34, including notes.
6 DIMENSIONS
6.1 General
Unless otherwise noted, the dimensions for socket-welding fittings given in Tables 4 and I1 and the dimensions for threaded fittings given in Tables 5, 6,7, I2, I3, and 14 are nominal values and subject to the designated manufacturing tolerance.
6.2 Socket Fittings
6.2.1 Body Wall Thickness.
The body wall thickness of socket-welding fittings shall be equal to or greater than the values, G, shown in Tables 4 and II.
6.2.2 Socket Wall Thickness.
The socket wall average thickness and minimum thickness shall be no less than the corresponding values, C, shown in Tables 4 and Il.
6,2.3 Socket Position.
The fixed position for the bottom of the socket with reference to the centerline of the socket-welding fitting shall be maintained as required by the dimensions, A, of Tables 4 and I1. For reducing fittings, see para. 6.5.
6.2.4 Socket Depth
The socket depth shall be no less than the minimun values, J ,shown in Tables 4 and I1.
6.2.5 Socket Bare.
The inside surface of the socket bore shall present a good workmanlike finish that is free of burrs.
6.2.6 Perpendicularity.
The end flats of socket-welding fittings shall be at right angles to the socket axis.
6.2.7 Width.
The forging radius shall not reduce the width of the value shown in flat welding surface to less than the Fig. 2.
6.3 Threaded Fittings
6.3.1 Wall Thickness.
The body or end wall thickness of threaded fittings shall be equal to or greater than the minimum values, G, as shown in Tables 5, 6, I2, or I3.
6.3.2 InternalThreading.
All fittings with internal threads shall be threaded with American National Standard Taper Pipe Threads (ASME B1.20.1). Variations in threading shall be limited to one turn large or one turn small from the gaging notch when using working gages. The reference paint for gaging is the starting end of the fitting, providing the chamfer does not exceed the major diameter of the internal thread. When a chamfer on the internal thread exceeds this limit, the reference point becomes the last thread scratch on the chamfer cone.
6.3.3 External Threads.
All externally threaded fittings shall be threaded with American National Standard Taper Pipe Threads (ASME B 1.20.1) and the variation in threading shall be limited to one turn large or one turn small from the gage face of ring when using working gages. The reference point for gaging is the end of the thread.
6.3.4 Countersink or Chamfer.
All internal threads shall be countersunk a distance not less than onehalf the pitch of the thread at an angle of approximately 45 deg with the axis of the thread, and all external threads shall be chamfered at an angle of 30 deg to 45 deg from the axis, for the purpose of easier entrance in making a joint and for protection of the thread. Countersinking and chamfering shall be concentric with the threads. The length of threads specified in all tables shall be measured to include the countersink or chamfer.
6.4 Collars
End collars of both socketwelding and threaded fittings shall be as illustrated in such that they overlap the crotch area the sketches in Tables 4, 5, Il,and I2.
6.5Reducing Fittings
Reducing fittings shall have the same center-to-end, center-to-bottom of socket, band diameter, and outside diameters t as the uniform size fitting corresponding to he largest size end connection of the reducing fitting.
7 TOLERANCES
7.1 Additional Tolerances
Tolerances in addition to those listed in Tables 4,5, 6, 7, I1, I2, I3. and I4.
7.1.1 Concentricity of Bores.
The socket and fitting bores shall be concentric within a 0.8 mm (0.03 in.) for all sizes. Opposite tolerance of socket bores shall be concentric within a tolerance of 1.5 nun (0.06in.) for all sizes.
7.7.2 Coincidence of Axes.
The maximum allow able variation in the alignment of the fitting bore and socket bore axes shall he 1.0 mm in 200 mm (0.06in. in 1 ft). The maximum allowable variation in alignment of threads shall be 1.0 mm in 200 mm (0.06in. in 1 ft).
ASME B16.11 – Forged Fittings, Socket-Welding and Threaded Pipe Fittings: Sw 90 Deg Elbow | Sw 45 Deg Elbow | Sw Tee | Sw Cross | Sw Half Coupling | Sw Full Coupling | Sw Cap | Thrd 90 Deg Elbow | Thrd 45 Deg Elbow | Thrd Street Elbow | Thrd Tee | Thrd Cross | Thrd Half Coupling | Thrd Full Coupling | Thrd Cap | Hex Head Plug | Square Head Plug | Round Head Plug | Hex Head Bushing | Flush Bushing


